by ptfadmin | Jul 6, 2026 | Health Tips
By: Dae Yun Seo, Sung Ryul Lee, Jun-Won Heo, Mi-Hyun No, Byoung Doo Rhee, Kyung Soo Ko, Hyo-Bum Kwak, Jin Han
Reviewed by: John Baur, PT, DPT, OCS, FAAOMPT
Summary
Seo and colleagues review ursolic acid (UA), a naturally occurring pentacyclic triterpenoid found in several fruits, herbs, and plant tissues, including apple peel, rosemary, thyme, lavender, marjoram, organum, flowers, and berries. The article positions UA as a biologically active compound with broad therapeutic potential because it appears to influence inflammation, oxidative stress, apoptosis, metabolism, mitochondrial activity, and muscle protein turnover. The review is organized by organ system and disease category rather than by a single pathway, which is appropriate because UA is presented as a pleiotropic compound whose effects depend heavily on tissue context. At the chemical level, UA is described as 3β-3-hydroxy-urs-12-ene-28-oic acid, with the formula C30H48O3 and molecular mass of 456.71 g/mol. This structural background supports the authors’ broader argument that UA has sufficient molecular complexity to interact with diverse cellular signaling networks.1
A major theme of the review is UA’s anti-cancer activity. Across skin, colon, breast, bladder, cervical, pancreatic, ovarian, and liver cancer models, the authors summarize evidence that UA can suppress tumor growth, reduce cancer cell proliferation, promote apoptosis, and modulate autophagy. The mechanisms described include inhibition of nuclear factor-kappa B (NF-kB) signaling, reductions in proteins associated with survival and proliferation such as Bcl-2, Bcl-xL, cyclin D1, STAT3, and EGFR, and activation of pro-apoptotic markers such as caspases. UA is also discussed as a regulator of metabolic stress in cancer cells, including AMPK activation and reductions in ATP production, lactate, and glycolytic enzymes. The review’s cancer section is persuasive mechanistically, but it is important to interpret it as mainly preclinical. Much of the cited evidence comes from cell lines and animal models, so the article supports UA as a promising anti-cancer lead compound rather than as an established clinical therapy.1
The article also highlights UA’s potential metabolic benefits in obesity, metabolic syndrome, and diabetes. The authors describe findings in which UA reduced body weight, body mass index, waist circumference, fasting glucose, triglycerides, free fatty acids, fat mass, and hepatic lipid accumulation. Several mechanisms are emphasized: improved insulin signaling, Akt activation, glucose transporter type 4 translocation, AMPK-dependent energy expenditure, increased fatty acid uptake and beta-oxidation, activation of peroxisome proliferator-activated receptor alpha (PPAR-alpha), and modulation of adipocyte transcription factors. One particularly important point is that UA appears to act in multiple metabolically active tissues, including skeletal muscle, adipose tissue, and liver. This makes the compound especially relevant to metabolic syndrome, in which insulin resistance, ectopic fat deposition, inflammation, and altered energy expenditure are interconnected.1
For cardiovascular disease, the review summarizes data suggesting cardioprotective and vasoprotective effects. In animal and cell models, UA was associated with reductions in heart rate, mean arterial pressure, neointimal formation, lipid peroxidation, serum markers of cardiac injury, apoptosis-related cardiac proteins, and inflammatory signaling. The authors emphasize antioxidant defense as a recurring mechanism, including increased activity or availability of superoxide dismutase, catalase, glutathione peroxidase, glutathione reductase, glutathione, and vitamins C and E. These findings suggest UA may protect cardiovascular tissue by reducing oxidative injury and stabilizing enzymes and membranes under ischemic or inflammatory stress. However, as with the cancer literature, the cardiovascular evidence summarized is mainly preclinical. The review therefore provides a mechanistic rationale for future cardiovascular research rather than definitive clinical evidence.1
The brain-focused section presents UA as a neuroprotective compound that may counter oxidative stress, excitotoxicity, neuroinflammation, and apoptosis. The authors discuss models of glioma invasion, D-galactose-induced neurodegenerative changes, subarachnoid hemorrhage, Parkinsonian injury, and cerebral ischemia-reperfusion. Across these models, UA is reported to lower reactive oxygen species, advanced glycation end products, inflammatory mediators, matrix metalloproteinases, and caspase-related apoptotic signaling while increasing antioxidant systems such as glutathione, catalase, and superoxide dismutase. A notable feature of the review is the repeated link between UA and NF-kB-related inflammation, which appears in cancer, brain, and other organ systems. The brain section reinforces the broader concept that UA may protect vulnerable tissues by simultaneously reducing inflammatory signaling and improving antioxidant capacity.1
The liver section is one of the strongest examples of UA’s multi-pathway profile. The authors summarize evidence related to fatty liver disease, hepatic steatosis, liver fibrosis, hepatocellular carcinoma, and liver cancer cell lines. In metabolic liver disease models, UA reduced liver weight, hepatic triglycerides, free fatty acids, liver injury markers such as AST and ALT, and lipogenesis-related factors including SREBP-1c, acetyl-CoA carboxylase, and fatty acid synthase. At the same time, it increased fatty-acid oxidation markers such as carnitine palmitoyltransferase-1 and acyl-CoA oxidase and promoted PPAR-alpha signaling. In fibrosis and cancer models, UA was associated with antioxidant pathways, Nrf2/antioxidant response element activation, apoptosis regulation, AMPK/GSK-3β signaling, p38-MAPK activity, and altered IGFBP1 and FOXO3a expression. These diverse findings support the authors’ conclusion that UA may be relevant to both metabolic and proliferative liver disorders.1
The final major section examines sarcopenia and exercise capacity, where UA is framed as a possible exercise mimetic. The authors describe evidence that UA may increase skeletal muscle mass, muscle fiber diameter, grip strength, exercise time, running distance, swimming duration, mitochondrial biogenesis, and serum or tissue markers related to IGF-1, irisin, Akt/mTOR, AMPK, SIRT1, and PGC-1alpha. UA also appears to reduce muscle atrophy pathways such as atrogin-1 and MuRF-1. This section is clinically appealing because sarcopenia and declining exercise capacity are common problems in aging and chronic disease. However, the review appropriately acknowledges that human data are mixed. Some studies reported improved muscle strength or lower markers of exercise-induced muscle damage, whereas others did not show meaningful changes in muscle mass, function, IGF-1, or Akt/mTOR signaling. This inconsistency makes the exercise-mimetic claim promising but not settled.1
Overall, the article presents UA as a compound with broad potential across cancer, metabolic disease, cardiovascular disease, brain injury, liver disease, sarcopenia, and exercise performance. Its unifying mechanisms include suppression of inflammation, reduction of oxidative stress, regulation of apoptosis and autophagy, improvement of insulin and lipid metabolism, support of mitochondrial function, and modulation of muscle protein turnover. The review’s greatest value is that it integrates findings across organ systems and identifies recurring pathways that may explain UA’s wide range of reported effects. Its major limitation is that many conclusions rely on cell culture or animal studies, with fewer rigorous human trials. Dose, formulation, bioavailability, safety, patient selection, and long-term outcomes remain insufficiently defined. Therefore, UA should be viewed as a promising natural compound for further translational research, not as a proven replacement for established therapies. The most useful next step would be well-designed clinical trials that test standardized UA preparations, clinically meaningful endpoints, and mechanistic biomarkers in specific patient populations.1
Visual Summary
The following visuals highlight how broadly the article organizes the reported effects of ursolic acid (UA). The chart below is a descriptive count of entries in the review tables, not a ranking of evidence quality or clinical certainty.1
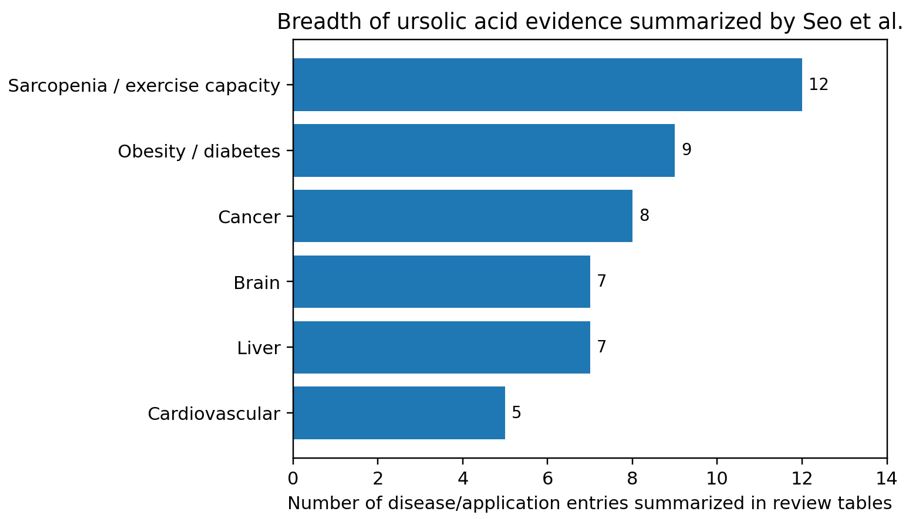
Figure 1. Breadth of disease/application areas represented in the review tables. Counts reflect table entries synthesized by the article and should not be interpreted as clinical strength of evidence.1
Article Figure
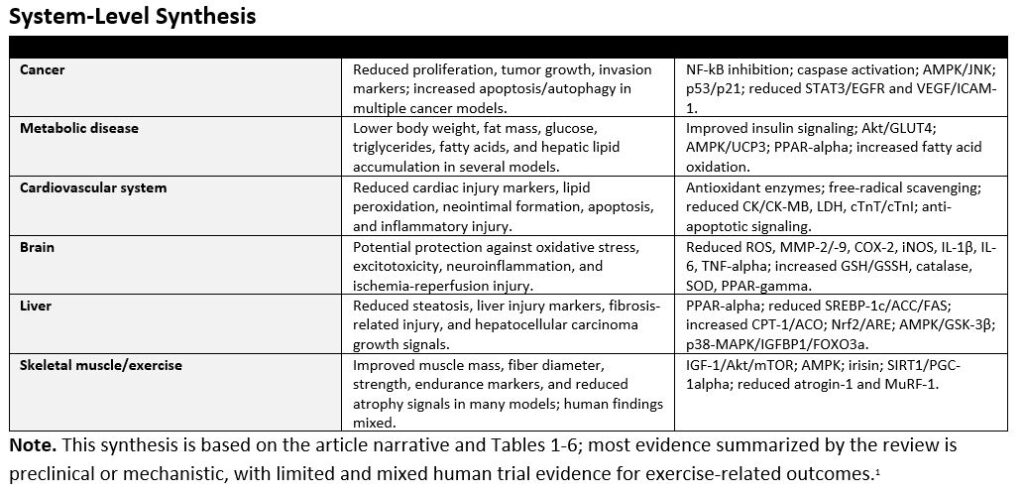
The article’s organ-system graphic provides a useful visual summary of UA’s proposed tissue-specific effects and mechanisms.1
Figure 2. Role of UA in various organs, reproduced from Seo et al. under the article’s open-access license.1
Reference
- Seo DY, Lee SR, Heo JW, et al. Ursolic acid in health and disease. Korean J Physiol Pharmacol. 2018;22(3):235-248. doi:10.4196/kjpp.2018.22.3.235
by ptfadmin | Jun 30, 2026 | Health Tips
Reviewed by: John Baur, PT, DPT, OCS, FAAOMPT
Christiansen and colleagues evaluated whether a telehealth-delivered physical activity behavior change (PABC) intervention could improve real-world activity after unilateral total knee arthroplasty (TKA), an important question because conventional rehabilitation frequently improves impairments and functional test performance without meaningfully changing sedentary lifestyle patterns. The authors framed the study around a clinically relevant gap: many people remain below recommended physical activity levels after TKA, and low activity is associated with poorer mobility, health, and potentially implant-related outcomes. Rather than testing another strengthening or mobility protocol, the trial asked whether rehabilitation should also include a structured self-management strategy designed to change daily behavior. 1
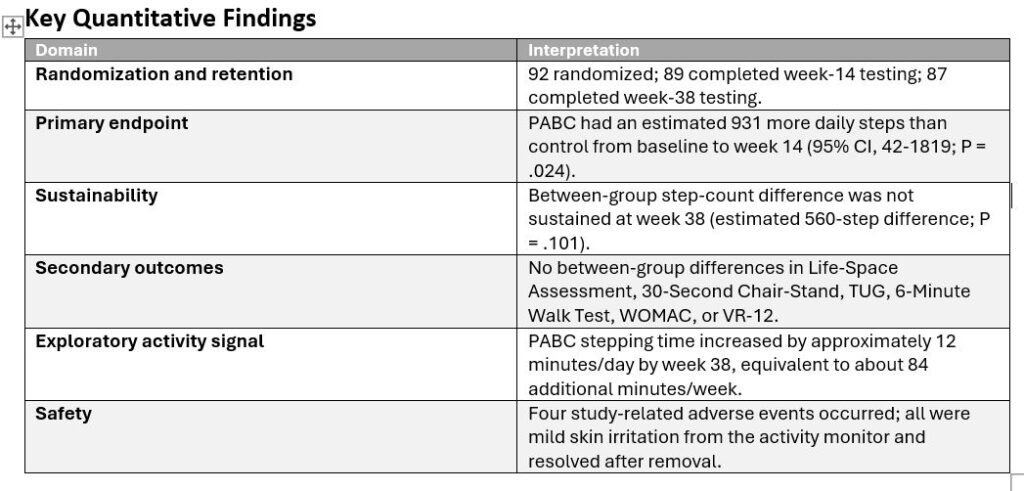
The study was a two-arm, parallel randomized controlled superiority trial conducted within the Veterans Affairs Eastern Colorado Health Care System. Ninety-two U.S. military veterans scheduled for primary unilateral TKA were randomized after returning home from surgery and before beginning conventional outpatient rehabilitation. Participants were 50 to 85 years old, with a mean age in the mid-60s, and the sample was predominantly male (88%), reflecting the VA setting. Randomization was stratified by baseline physical activity level (<5000 versus >=5000 steps/day) and age decade, and outcome assessors were blinded. Both groups received standardized conventional outpatient TKA rehabilitation beginning approximately 2 to 4 weeks after surgery and delivered over 12 sessions tapered across 14 weeks.
The experimental PABC program was layered onto conventional rehabilitation. It consisted of 10 one-to-one telehealth sessions, each 30 minutes, delivered over 12 weeks by trained rehabilitation professionals. Sessions were intentionally tapered: two sessions occurred twice weekly at the start, sessions three through eight occurred weekly, and the final two sessions occurred every other week. Participants were given a wrist-worn Fitbit for daily step-count feedback, while primary outcome measurement used a separate activPAL monitor that did not provide feedback. The behavioral intervention was built around seven linked techniques: education, self-monitoring, tailored feedback, barrier and facilitator identification, problem solving, action planning, and encouragement. Importantly, the intervention shifted from interventionist-led coaching toward participant-led self-management. Action planning used a practical progression target of approximately 3% higher daily steps from the previous week, although goals were tailored to the participant. The attention-control group received telehealth health education sessions matched for frequency and duration, but the content was unrelated to physical activity and included pain management, home safety, diet, medication management, falls, and fractures.
The primary outcome was average daily step count measured with activPAL monitoring during 10-day wear periods at baseline, 8 weeks after surgery, 14 weeks after surgery, and 38 weeks after surgery. The 14-week time point was the primary endpoint. Secondary outcomes included Life-Space Assessment, 30-Second Chair-Stand, Timed Up and Go, 6-Minute Walk Test, Western Ontario and McMaster Universities Osteoarthritis Index (WOMAC), and Veterans RAND 12-Item Health Survey. Exploratory measures included self-efficacy for exercise and time spent sitting/lying, standing, and stepping. This outcome set is a major strength because it separated physical capacity from free-living behavior, allowing the authors to test whether walking more in daily life followed from improved function or required targeted behavior-change support. 1
The PABC intervention produced a statistically significant short-term improvement in physical activity. From baseline to 14 weeks, the PABC group had an estimated 931 more daily steps than the control group (95% CI, 42-1819; P = .024). Model-estimated daily step counts were similar at baseline (6798 steps/day in both groups), but diverged during rehabilitation: at week 8, the control group averaged 5660 steps/day compared with 6789 in the PABC group; at week 14, the control group averaged 6269 steps/day compared with 7199 in the PABC group. This effect reflects a clinically meaningful behavioral signal, particularly because the control group showed a temporary post-surgical reduction in steps while the PABC group essentially maintained or improved activity through the rehabilitation period. Intervention fidelity was high: PABC fidelity was 97%, control fidelity was 95%, and conventional rehabilitation fidelity was 93%. Fitbit engagement was also strong; all PABC participants reported using the device, and most used it at least daily during the intervention. 1
However, the effect was not sustained at 38 weeks. At follow-up, the PABC group averaged 7345 estimated steps/day compared with 6785 in the control group, a 560-step difference that did not reach statistical significance (P = .101). The absence of a sustained between-group difference is central to interpretation. It suggests that the intervention can shift activity while coaching and feedback are active, but maintenance may require additional booster contacts, peer support, more intensive habit formation strategies, or targeted use among patients with lower baseline activity. The authors also noted that the sample began with relatively high step counts, near 6800 steps/day, and both groups were above 6000 steps/day by 38 weeks. A future trial in patients below 6000 steps/day, or with known psychosocial or environmental barriers, may show a more durable and clinically important effect. 1
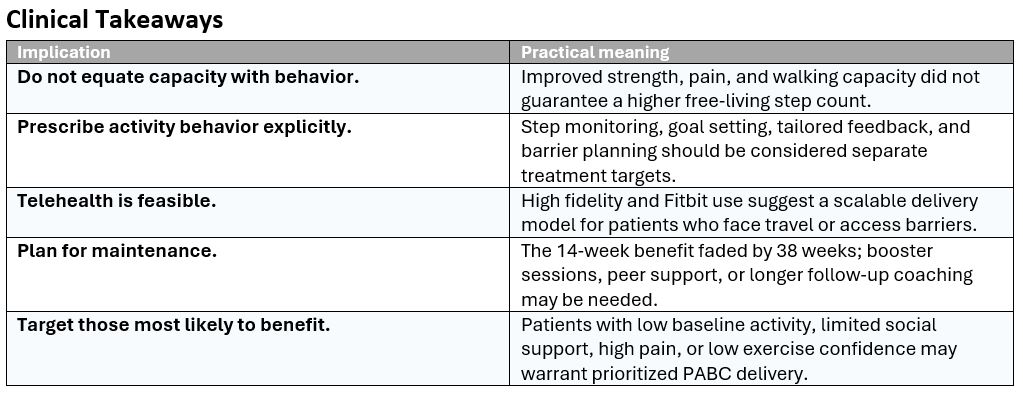
Secondary outcomes improved in both groups but did not differ between groups at either 14 or 38 weeks. This finding is clinically important rather than disappointing. Chair-stand performance, walking capacity, pain, and WOMAC physical function improved with rehabilitation, but those improvements did not automatically translate into greater daily physical activity. The study therefore reinforces a key rehabilitation principle: capacity and behavior are related but not interchangeable. A patient may become stronger, walk farther in a test, and report less pain while still not increasing free-living movement. The PABC model directly addressed that gap by targeting self-efficacy, goal setting, environmental barriers, problem solving, and feedback.
Exploratory findings further support the behavioral interpretation. The PABC group increased observed average daily stepping time from 1.5 hours at baseline to 1.7 hours at week 38, while the control group remained at 1.6 hours. The authors translated the 0.2-hour increase into approximately 84 additional minutes of walking per week. At week 38, the PABC group also spent a greater share of stepping time in longer bouts (>5 minutes) than the control group, suggesting that the intervention may have promoted more purposeful walking rather than only brief household steps. Safety was favorable: four study-related adverse events occurred, all mild skin irritation from the thigh-mounted activity monitor, and no signal suggested increased health care utilization from the intervention.
The trial has several limitations. Generalizability is restricted because the study was conducted in a VA system and included mostly male veterans. The intervention also combined multiple active components, so the study cannot identify whether the most important ingredient was the Fitbit, coaching, motivational interviewing style, action planning, or the overall self-management structure. The PABC design did not include peer social support, despite evidence that peer support can help with goal attainment. Three interventionists were cross-trained across study arms, which creates some possibility of treatment contamination, although fidelity monitoring was strong. Finally, COVID-19 affected in-person testing during the trial, although the authors reported no clear difference in the intervention effect before versus after pandemic onset. 1
Overall, this article provides strong evidence that adding a telehealth self-management intervention to conventional TKA rehabilitation can improve daily physical activity at the end of the intervention, even when functional outcomes are similar between groups. Its most practical message is that post-TKA rehabilitation should not assume improved strength, gait, or pain automatically leads to a more active lifestyle. Clinicians who want patients to move more after TKA may need to prescribe and coach physical activity behavior explicitly, using step monitoring, feedback, goal progression, barrier planning, and self-management strategies. The next step is not merely to prove that PABC works in the short term, but to refine who needs it most and how to sustain the gains beyond the active treatment window.
Visual Synthesis
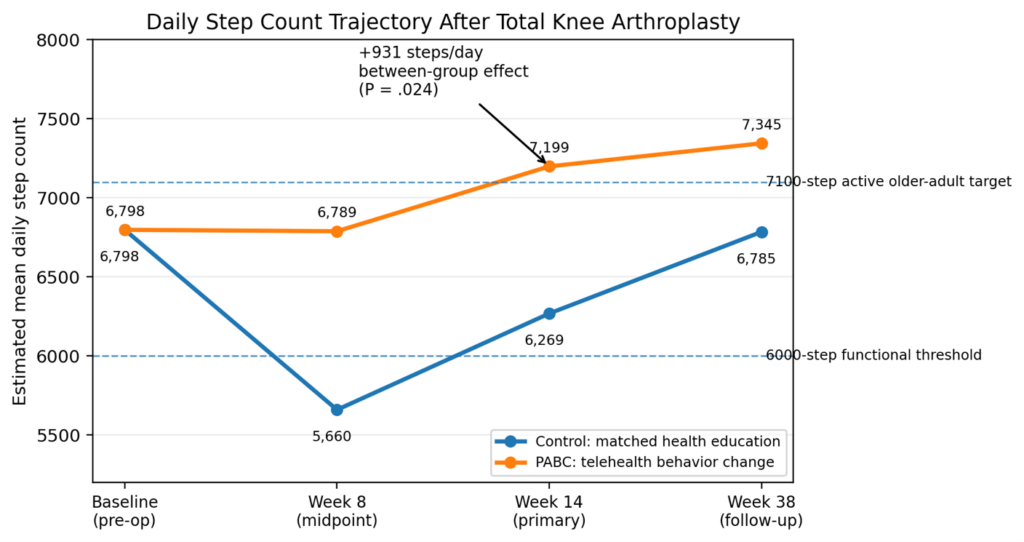
Figure 1. Estimated daily step counts across the TKA rehabilitation timeline. Values are model-estimated means from the article tables; week 14 was the primary endpoint.
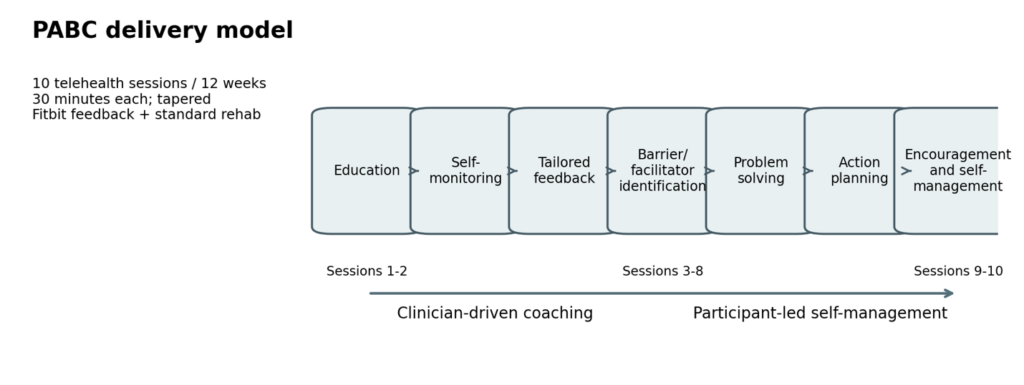
Figure 2. The PABC model combined step-count feedback with behavioral self-management techniques, progressing from clinician coaching to participant-led action planning.
Reference
- Christiansen CL, Kline PW, Anderson CB, Melanson EL, Sullivan WJ, Richardson VL, et al. Optimizing total knee arthroplasty rehabilitation with telehealth physical activity behavior change intervention: a randomized clinical trial. Phys Ther. 2024;104:pzae088. doi:10.1093/ptj/pzae088
by ptfadmin | Jun 22, 2026 | Health Tips, Uncategorized
Reviewed by: John Baur, PT, DPT, OCS, FAAOMPT
Takeaways
- The walking plus education program reduced activity-limiting low back pain recurrence by 28% relative to no treatment.
- Median time to activity-limiting recurrence increased from 112 days in the control group to 208 days in the intervention group.
- Care-seeking recurrence was reduced more strongly than any recurrence, supporting a practical self-management benefit.
- The program had a 94% probability of being cost-effective at a willingness-to-pay threshold of AU$28,000 per QALY.
- Lower extremity adverse events were more common with the intervention, so progression should be individualized and monitored.
Visual Summary of Key Findings
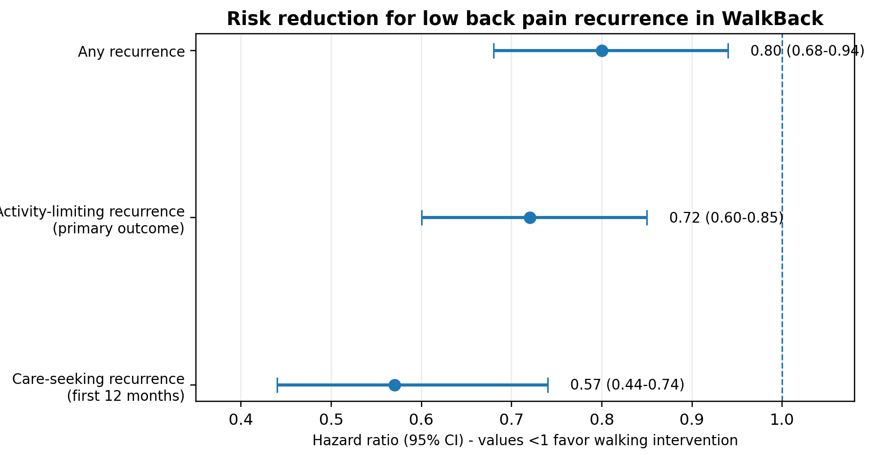
Figure 1. Hazard ratios for the three recurrence outcomes. Values below 1.0 favor the walking and education intervention.

Figure 2. Time-to-recurrence markers reported in the WalkBack trial. Care-seeking recurrence used the 25th percentile because fewer than 50% of intervention participants experienced that event.
Pocovi and colleagues report the WalkBack trial, a pragmatic, two-arm randomized controlled trial designed to test whether a simple, scalable walking and education program could prevent recurrence of non-specific low back pain after recovery. The study addresses an important clinical gap: low back pain is common, recurrent, and costly, yet many prevention programs that combine exercise and education require supervised classes, equipment, or ongoing clinician contact. Walking is inexpensive, familiar, and broadly accessible, but before this trial its effectiveness for preventing low back pain recurrence had not been established in a randomized trial.1
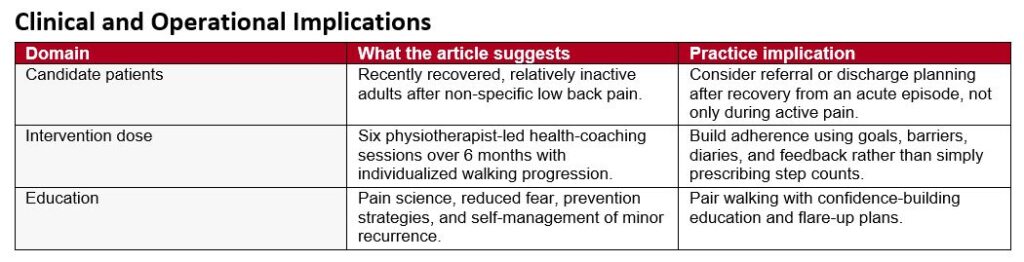
The investigators recruited adults across Australia who had recovered from a recent episode of non-specific low back pain lasting at least 24 hours, with pain greater than 2 on a 0-to-10 scale and at least some interference with day-to-day activities. Recovery was defined as more than 7 consecutive days with pain no greater than 1 out of 10. Key exclusions included comorbidities that prevented walking, current regular walking for exercise, participation in another low back pain prevention program, already meeting moderate or vigorous physical activity guidelines, recent spinal surgery, pregnancy, or inadequate English for study questionnaires. This eligibility approach means the study is most applicable to recently recovered, relatively inactive adults rather than to people with chronic persistent back pain or those already exercising regularly.
A total of 701 participants were randomized: 351 to the intervention and 350 to a no-treatment control group. Participants were predominantly female (81%), and the mean age was 54 years. The intervention consisted of six sessions with a registered physiotherapist over 6 months, with the first five sessions occurring in the first 12 weeks and a booster session at 6 months. The physiotherapist acted as a health coach, helping each participant set a progressive, individualized walking plan. The guiding target was walking 30 minutes per day, 5 days per week by 6 months, but dosing and progression were adapted to baseline activity, age, body mass index, comorbidities, confidence, goals, time constraints, and environmental factors. Participants also received a pedometer and a walking diary for the first 12 weeks.
Education was deliberately paired with the walking prescription. The education component emphasized modern pain science, reduction of fear related to low back pain, practical strategies to reduce recurrence risk, and self-management of minor flare-ups. This pairing is clinically important because recurrent low back pain is not only a mechanical problem; fear, avoidance, low self-efficacy, and uncertainty about safe activity can all influence behavior. The physiotherapists were trained in health coaching, including open-ended questioning, active listening, motivational interviewing, participant-led goal setting, and strategies to promote self-efficacy. Because the trial was disrupted by COVID-19 restrictions, many sessions were delivered by telehealth, which ultimately broadened recruitment across metropolitan, regional, rural, and remote areas.
The primary outcome was time from randomization to the first recurrence of activity-limiting low back pain. Recurrence was measured monthly and defined as a new episode lasting at least 24 hours, with pain intensity greater than 2 out of 10 and at least somewhat interfering with daily activities. Secondary recurrence outcomes were any recurrence and care-seeking recurrence. Additional outcomes included disability, health-related quality of life, physical activity, sedentary behavior, use of co-interventions, adverse events, and cost-effectiveness from a societal perspective. The intention-to-treat analysis and regular monthly follow-up strengthened the time-to-event design and reduced the likelihood of major recall error.
The main clinical result was clear: the walking and education intervention reduced risk of activity-limiting recurrence. The hazard ratio was 0.72 (95% CI, 0.60-0.85; p=0.0002), which corresponds to a 28% relative reduction in recurrence risk. Median time to recurrence was 208 days in the intervention group compared with 112 days in the control group, nearly doubling the time before half of participants experienced an activity-limiting recurrence. The intervention also reduced any recurrence (HR, 0.80; 95% CI, 0.68-0.94; p=0.0066) and care-seeking recurrence during the first 12 months (HR, 0.57; 95% CI, 0.44-0.74; p<0.0001). For care-seeking recurrence, the 25th percentile time to recurrence was 295 days in the intervention group compared with 116 days in the control group, suggesting a particularly meaningful reduction in episodes that drove health care use.
Secondary outcomes supported the primary findings. Back pain-related disability, measured with the Roland-Morris Disability Questionnaire, favored the intervention at every measured time point through 12 months. Differences were modest but consistent, with a 12-month between-group mean difference of -1.28 points. At 3 months, accelerometer data showed that the intervention group took 611 more steps per day, 616 more brisk steps per day, and accumulated 6.4 more minutes per day of moderate-to-vigorous physical activity. Self-reported walking was also higher at 3 months by about 51 minutes per week, although this difference was no longer present at 12 months. That attenuation may reflect increased walking in the control group, reduced ongoing clinician support after the early intervention period, discontinuation of walking diaries, the impact of lower extremity symptoms, or broader pandemic-related changes in walking behavior.
The economic evaluation is one of the article’s most practice-relevant contributions. The intervention cost AU$414 per participant to deliver. From the societal perspective, mean cost per participant was higher in the intervention group than control group, but the intervention generated more quality-adjusted life-years and fewer activity-limiting recurrences. The incremental cost-effectiveness ratio was AU$7802 per QALY gained, and the authors reported a 94% probability of cost-effectiveness at a willingness-to-pay threshold of AU$28,000 per QALY. The cost per participant prevented from having an activity-limiting recurrence was AU$1120. These findings suggest that the intervention is not merely clinically effective but potentially attractive for health systems seeking low-cost prevention strategies.
Safety findings were generally reassuring but require clinical attention. The proportion of participants with at least one adverse event was similar across groups (52% in the intervention group and 54% in the control group), and serious adverse events were also similar (11% vs 10%). However, lower extremity-related adverse events occurred more often in the intervention group, with 100 events reported among 72 participants compared with 54 events among 41 participants in the control group. This pattern is plausible for a walking intervention and reinforces the need for individualized progression, attention to footwear and terrain, monitoring for early lower limb symptoms, and modification rather than rigid adherence when irritability develops.
Several limitations temper interpretation. Participants and treating physiotherapists could not be masked, and several outcomes were self-reported, which may introduce expectation or reporting bias. Generalizability is limited because most participants were women, most were middle-aged or older, ethnicity was not collected, questionnaires required English, and people who were already physically active were excluded. The control group received no structured intervention, so the trial estimates effectiveness against usual nonintervention rather than against an attention-matched education or exercise comparator. Finally, because walking and education were delivered together, the study cannot determine whether the walking prescription, pain education, health coaching, or their combination was the active driver of benefit.
Overall, the WalkBack trial provides strong evidence that a modest number of health-coaching sessions supporting individualized progressive walking, combined with education, can delay recurrence of low back pain and reduce care-seeking episodes in recently recovered, inactive adults. The intervention aligns well with modern guideline principles that emphasize active self-management, reassurance, graded activity, and avoidance of unnecessary medicalization. Its accessibility, compatibility with telehealth, low delivery cost, and favorable cost-effectiveness profile make it a practical candidate for implementation after recovery from an acute low back pain episode. Clinicians should frame walking as a progressive, individualized prevention strategy rather than a generic instruction to walk more, and should pair it with education that builds confidence, reduces fear, and equips patients to manage minor recurrences without overreacting or withdrawing from activity.

Figure 3. Practical implementation model for the WalkBack intervention based on the article description.
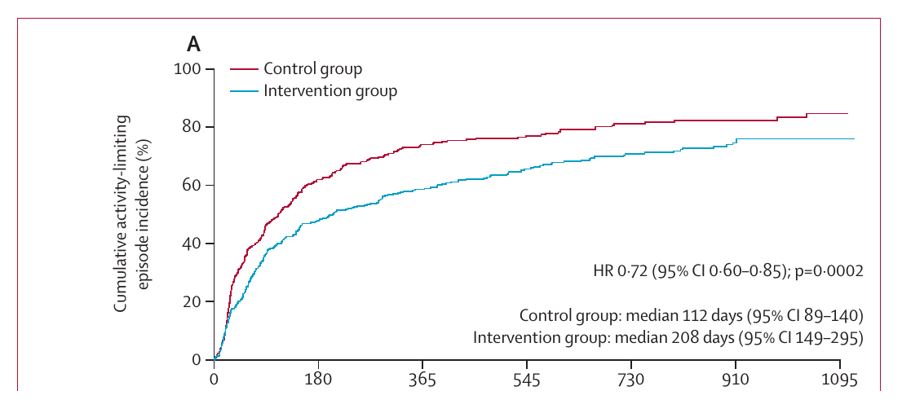
Figure 4. Article Figure 2A excerpt showing cumulative incidence of the primary activity-limiting recurrence outcome. Reproduced from Pocovi et al. under CC BY 4.0.

Reference
- Pocovi NC, Lin C-WC, French SD, et al. Effectiveness and cost-effectiveness of an individualised, progressive walking and education intervention for the prevention of low back pain recurrence in Australia (WalkBack): a randomised controlled trial. Lancet. 2024;404:134-144. doi:10.1016/S0140-6736(24)00755-4
by ptfadmin | Jun 15, 2026 | Health Tips
Summary by John Baur, PT, DPT, OCS, FAAOMPT
This Cochrane review evaluates the effectiveness of exercise for adults with knee osteoarthritis (OA), a common condition associated with chronic pain, reduced physical function, and poorer quality of life. Exercise is recommended in clinical guidelines as a nonpharmacologic treatment, yet earlier evidence often grouped all control conditions together. The authors argue this can be misleading because exercise may seem more effective against usual care or no treatment than against attention controls or placebo interventions. Accordingly, this review compared exercise with three control approaches: attention control or placebo, no treatment/usual care/limited education, and exercise added to another co-intervention versus that co-intervention alone.
The review updated a 2015 Cochrane analysis by searching CENTRAL, MEDLINE, Embase, ClinicalTrials.gov, and the World Health Organization trials registry from May 2013 through January 4, 2024, without language restrictions. Only randomized controlled trials were included. Eligible studies involved adults with knee OA participating in exercise programs that varied in type, supervision, delivery, and duration. Primary outcomes were pain severity, self-reported physical function, and quality of life; secondary outcomes were treatment success, withdrawals, and adverse events. Outcomes were assessed immediately after treatment and, when available, up to or beyond 12 months after the intervention ended.
The review included 139 trials involving 12,468 participants. Thirty trials compared exercise with attention control or placebo, 60 compared exercise with no treatment, usual care, or limited education, and 49 examined exercise added to another conservative intervention such as weight loss, physical therapy, or education. Programs ranged from 2 to 104 weeks, and participants were 41 to 81 years old. Exercise interventions were heterogeneous, including strengthening, aerobic, mind-body, stretching, balance, and mixed programs delivered individually, in groups, in person, or remotely.
A major theme of the review is methodological weakness. Most trials were judged to be at unclear or high risk of bias. The biggest problems were performance and detection bias because participants knew whether they were exercising and outcomes were self-reported. More than half of studies also had concerns about selection bias or selective reporting. These weaknesses lowered certainty in the findings and may have exaggerated the benefits of exercise.
Compared with attention control or placebo, exercise produced modest short-term effects. Pain improved by 8.7 points on a 0 to 100 scale, physical function by 11.27 points, and quality of life showed little to no improvement. Exercise likely increased treatment success and did not clearly increase withdrawals or adverse events. However, this evidence was low to moderate certainty, and longer-term data were sparse.
Compared with no treatment, usual care, or limited education, exercise showed somewhat larger short-term benefits. Pain improved by 13.14 points, physical function by 12.53 points, and quality of life by 5.37 points. These gains were larger than those seen against attention control, reinforcing the importance of comparator type. Still, the review found little evidence that exercise improved treatment success, and adverse events may have increased. Benefits up to 12 months were present but smaller than immediate post-treatment effects.
When exercise was added to another co-intervention, it again improved outcomes. Pain improved by 10.43 points, physical function by 9.66 points, and quality of life by 4.22 points. Exercise also increased treatment success and slightly reduced withdrawals, although adverse events increased slightly. These effects were supported mostly by moderate-certainty evidence and were sustained up to 12 months, though the magnitude remained small.
An important interpretive feature of the review is its emphasis on clinical significance rather than statistical significance alone. The authors compared pooled effects with minimal important difference thresholds: 12 points for pain, 13 for function, and 15 for quality of life on 0 to 100 scales. In most analyses, confidence intervals either failed to reach these thresholds or crossed both clinically important and unimportant ranges. Sensitivity analyses that removed low-quality or underpowered trials generally reduced effect sizes further. The authors therefore conclude that exercise probably improves pain, function, and quality of life in the short term, but the real-world size of these benefits is uncertain.
Subgroup analyses and meta-regression found no meaningful differences among exercise types and no relationship between outcomes and either the total number of prescribed sessions or the ratio of live clinician contact between groups. Overall, the review supports exercise as a first-line treatment for knee OA, but it also cautions clinicians against overstating its effects. Exercise appears to help, especially when compared with doing little or nothing, yet its benefits may be modest and influenced by contextual factors, trial bias, and patient expectations. Future research should emphasize stronger trial design, clearer adverse-event reporting, and long-term follow-up.
Reference
Lawford BJ, Hall M, Hinman RS, et al. Exercise for osteoarthritis of the knee. Cochrane Database Syst Rev. 2024;(12):CD004376. doi:10.1002/14651858.CD004376.pub4
by ptfadmin | Jun 8, 2026 | Health Tips
Reviewed by John Baur, PT, DPT, OCS, FAAOMPT
Teirlinck et al examined whether supervised exercise therapy improves pain and function for adults with hip osteoarthritis (OA) and whether additional randomized trials are likely to change the evidence base.1 The review addresses a practical clinical and research question: exercise is already recommended for OA, but compared with knee OA, hip OA has fewer trials, requiring assessment of whether the evidence is sufficient or whether placebo/no-treatment trials are justified.
The authors updated evidence from prior Cochrane reviews by searching CENTRAL, MEDLINE, EMBASE, CINAHL, PEDro, and Web of Science through September 2021. They included randomized controlled trials of adults with clinical and/or radiographic hip OA in which the intervention was supervised, active exercise therapy delivered by a therapist and evaluated as a standalone treatment. Control groups received usual care, education, no treatment, or a waiting-list condition. Multimodal programs and non-exercise physical modalities such as ultrasound, hot packs, or transcutaneous electrical nerve stimulation were excluded. The main outcomes were pain and function measured immediately after treatment and again 6 to 9 months later.
Eighteen trials met the inclusion criteria. The flowchart shows a search process: 10,033 initial citations were reduced to 4,548 after removal of duplicates, 297 were screened in full text, and 18 hip OA studies were ultimately included. The trials were heterogeneous in size and intervention design. Table 1 shows that study arms ranged from very small samples to approximately 100 participants, and the exercise programs varied in format, intensity, frequency, and duration. Most interventions were land-based; one used aquatic exercise. Twelve studies used group-based exercise, while six used individual therapy. Sessions ranged from 30 to 120 minutes, were commonly delivered one to three times weekly, and lasted 5 to 16 weeks. Outcome instruments also varied, including WOMAC, HOOS, VAS, NRS, IRGL, Harris Hip Score, HAQ, DRI, and the 6-minute walk test.
Risk of bias was generally acceptable but not perfect. Table 2 reports that 13 studies had overall low risk of bias, two had moderate risk, and three had high risk. An unavoidable limitation was blinding: because exercise interventions are visible and outcomes were often patient reported, most studies could not blind participants, therapists, or outcome assessors. The authors used GRADE to judge certainty, finding high-quality evidence for pain after treatment and for pain and function at 6 to 9 months, and moderate-quality evidence for function immediately after treatment because of inconsistency.
The pooled results favored exercise therapy, but the effects were modest. Immediately after treatment, exercise improved pain with a standardized mean difference (SMD) of -0.38 and function with an SMD of -0.31. At 6 to 9 months, exercise also favored pain (SMD -0.23) and function (SMD -0.29). The authors defined an SMD of -0.37 or lower as clinically worthwhile, meaning that post-treatment pain just met the numerical threshold, while function and longer-term outcomes were beneficial but of unclear clinical importance. The cumulative forest plots on pages 6 and 7 show that evidence for benefit became statistically significant early for some outcomes and then became more precise as later trials were added, rather than changing direction.
A distinctive feature of this review is its use of cumulative meta-analysis and extended funnel plots to ask whether more trials are needed. The funnel plot did not suggest obvious publication bias. The extended funnel plot on page 8 simulated the impact of adding a future study and showed that only a trial with a much larger effect than current evidence, or an extraordinarily large trial, would move the pooled estimate into a clearly clinically worthwhile range. Their simulation estimated that a new trial using the current post-treatment pain effect would need 74,843 participants to make the pooled effect clearly clinically worthwhile. This is a central finding: more conventional trials comparing exercise with minimal or no treatment are unlikely to change the conclusion.
Overall, the article supports supervised exercise therapy as an effective conservative option for hip OA, while cautioning that the average benefit is small and may not be clearly meaningful for every patient. Its strongest contribution is not simply confirming benefit, but arguing that future research should shift away from repeating exercise-versus-no-treatment comparisons. The authors recommend focusing instead on which patients benefit most, which exercise types are most effective, and what dose, intensity, frequency, and delivery format produce the best outcomes. Clinically, the review reinforces exercise as reasonable, low-risk care, but it also highlights the need for individualized programs and better evidence about responders, moderators, and optimal exercise prescriptions.
Reference
- Teirlinck CH, Verhagen AP, van Ravesteyn LM, et al. Effect of exercise therapy in patients with hip osteoarthritis: a systematic review and cumulative meta-analysis. Osteoarthritis Cartilage Open. 2023;5:100338. doi:10.1016/j.ocarto.2023.100338
by ptfadmin | Jun 1, 2026 | Health Tips
Reviewed by: John Baur, PT, DPT, OCS, FAAOMPT
Koc and colleagues present the 2023 revision of the Academy of Orthopaedic Physical Therapy/American Physical Therapy Association clinical practice guideline for heel pain and plantar fasciitis. The article is a focused evidence update intended to help clinicians diagnose, classify, examine, and manage plantar fasciitis within an impairment- and function-based framework. The authors distinguish plantar heel pain as an umbrella term from plantar fasciitis as a more specific clinical entity, emphasizing medial plantar heel pain, tenderness at the medial calcaneal tubercle, and symptoms that are characteristically worse with the first steps after rest or after prolonged weight-bearing.1
The guideline is clinically important because plantar fasciitis is common, often persistent, and frequently seen in both athletic and nonathletic populations. The article notes that plantar fasciitis contributes to approximately 15% of foot pathology in the general population, most often affects adults between 40 and 60 years of age, and may be more common in runners and people whose work requires prolonged standing. Although the term “fasciitis” implies inflammation, the guideline recognizes that the condition may occur along a spectrum that includes inflammatory and degenerative features. This framing is useful because it supports a multimodal plan centered on load management, mobility, tissue tolerance, and function rather than a single inflammatory model.
Methodologically, this revision updates the 2014 clinical practice guideline and concentrates primarily on physical therapist interventions. The authors searched MEDLINE, CINAHL, the Cochrane Library, and PEDro for intervention literature published from December 2012 through March 2023. They graded individual studies by levels of evidence and translated the evidence into recommendation grades ranging from A, reflecting strong evidence, to F, reflecting expert opinion. Risk factors, diagnosis, differential diagnosis, and examination recommendations were largely carried forward from the previous guideline because the authors did not identify new evidence requiring major revisions in those areas. The guideline also explicitly states that it should inform, not replace, individualized clinical judgment and patient preference.
The diagnostic section remains practical and highly usable. Clinicians are encouraged to consider plantar fasciitis when the history and examination show plantar medial heel pain that is most noticeable with initial steps after inactivity, worsens after prolonged weight-bearing, and follows a recent increase in weight-bearing activity. Physical examination findings supporting the diagnosis include pain with palpation of the proximal plantar fascia insertion, a positive windlass test, negative tarsal tunnel tests, limited active and passive talocrural dorsiflexion, abnormal Foot Posture Index-6 findings, and high body mass index in nonathletic individuals. The guideline also highlights risk factors such as limited ankle dorsiflexion, running, and occupational weight-bearing demands, particularly when shock absorption is poor.
The article emphasizes careful differential diagnosis. Clinicians should reconsider the diagnosis or seek consultation when symptoms are inconsistent with plantar fasciitis or fail to improve with appropriate impairment-focused care. Conditions to consider include spondyloarthritis, fat-pad atrophy, proximal plantar fibroma, calcaneal stress fracture, tarsal tunnel syndrome, entrapment of the medial calcaneal nerve or Baxter nerve, S1 radiculopathy, and insertional Achilles tendinopathy. Imaging is usually unnecessary when the clinical presentation is straightforward. If imaging is warranted after failed conservative care or diagnostic uncertainty, the guideline notes that weight-bearing radiographs are generally the first study for chronic foot pain; magnetic resonance imaging without contrast or diagnostic ultrasound may then be considered. Findings such as plantar fascia thickening greater than 4 mm and hypoechoic appearance can support the diagnosis, but imaging abnormalities can be nonspecific and must be interpreted with the clinical picture.
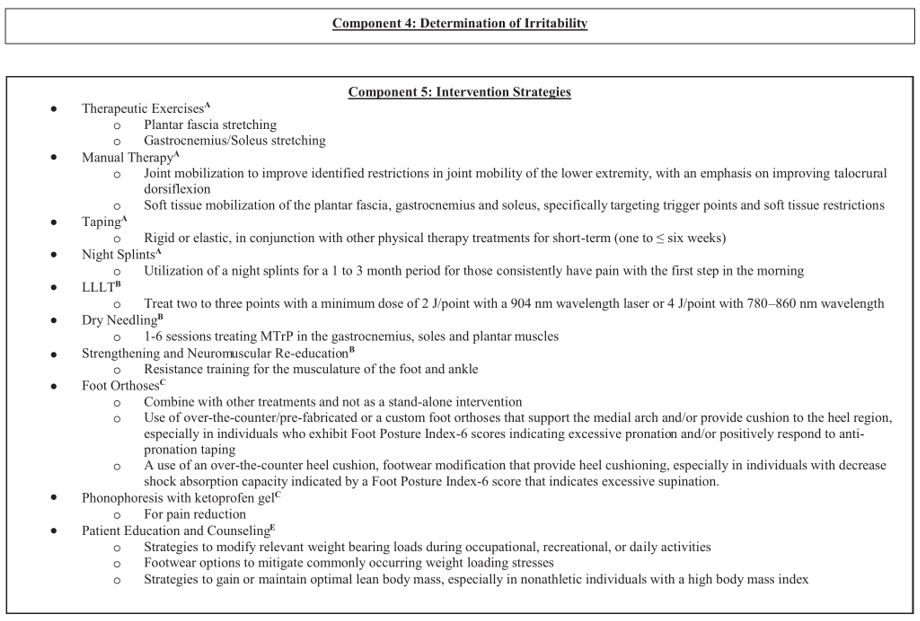
For outcomes and examination, the guideline recommends using validated self-report instruments such as the Foot and Ankle Ability Measure, Foot Health Status Questionnaire, Foot Function Index, and computer-adaptive Lower Extremity Functional Scale. Clinicians should also track reproducible activity limitations and key impairments, including first-step pain, pain with palpation, ankle dorsiflexion range of motion, and body mass index when relevant. The foot and ankle examination outline is broader than a simple heel-pain screen and includes range of motion, joint mobility when deficits are identified, manual muscle testing, heel-raise performance, dorsiflexion lunge testing, Foot Posture Index-6, single-leg squat, gait, balance, special testing, and strategic palpation to assess competing diagnoses.
The strongest intervention recommendations support a multimodal, active, impairment-based plan. Grade A recommendations state that clinicians should use manual therapy directed at lower-extremity joints and soft tissues to address joint and flexibility restrictions, reduce pain, and improve function. Plantar fascia-specific stretching and gastrocnemius/soleus stretching are also strongly recommended for short- and long-term pain reduction and functional improvement. Foot taping, either rigid or elastic, should be used with other physical therapy treatments for short-term improvement in pain and function. Night splints are strongly recommended for a 1- to 3-month period in patients who consistently report first-step morning pain. Importantly, a Grade A negative recommendation states that therapeutic ultrasound should not be used to enhance the benefits of stretching.
Several recommendations are more conditional. Foot orthoses should not be used as an isolated short-term pain-relief treatment, because meta-analyses suggest small to no short-term benefit when orthoses are used alone. However, prefabricated or custom orthoses may be used as part of a combined treatment plan to reduce pain and improve function. Low-level laser therapy has moderate support as part of rehabilitation for short-term pain reduction, while phonophoresis with ketoprofen gel may be used for pain reduction based on weaker evidence. Electrotherapy is positioned as a second-line option; the guideline suggests clinicians may prioritize manual therapy, stretching, and orthoses over electrotherapeutic modalities for short- and long-term outcomes.
The 2023 revision strengthens the role of exercise and dry needling. Clinicians should prescribe therapeutic exercise that includes resistance training for the foot and ankle musculature. Evidence reviewed in the guideline suggests benefit from strengthening programs, heavy-load training, supervised rehabilitation, and multimodal physical therapy that combines education, manual therapy, stretching, resistance training, and neurodynamic interventions. Dry needling to myofascial trigger points in the gastrocnemius, soleus, and plantar foot muscles receives a Grade B recommendation for short- and long-term pain reduction and long-term improvement in function and disability. Reported harms are generally mild, including postneedling soreness and minor bleeding.
Overall, the guideline provides an actionable framework for clinicians managing plantar fasciitis. Its central message is not that one intervention is universally sufficient, but that care should be matched to patient presentation, irritability, impairments, function, and response over time. High-value care prioritizes stretching, manual therapy, taping, symptom-guided night splints, targeted resistance training, load and footwear counseling, and selected adjuncts when appropriate. The main gaps are not whether treatment can help, but which combinations, doses, and sequencing strategies are most effective for specific subgroups of patients. For clinical practice, the article supports a structured approach: confirm the diagnosis, rule out mimics, measure baseline pain and function, apply evidence-supported interventions, reassess regularly, and escalate or consult when recovery is delayed or atypical.
Visual Synthesis
Figure 1. Evidence strength of major intervention statements. A higher grade reflects stronger supporting evidence, not necessarily a stronger “use” recommendation; some high-grade statements are negative recommendations, such as not using therapeutic ultrasound to enhance stretching.
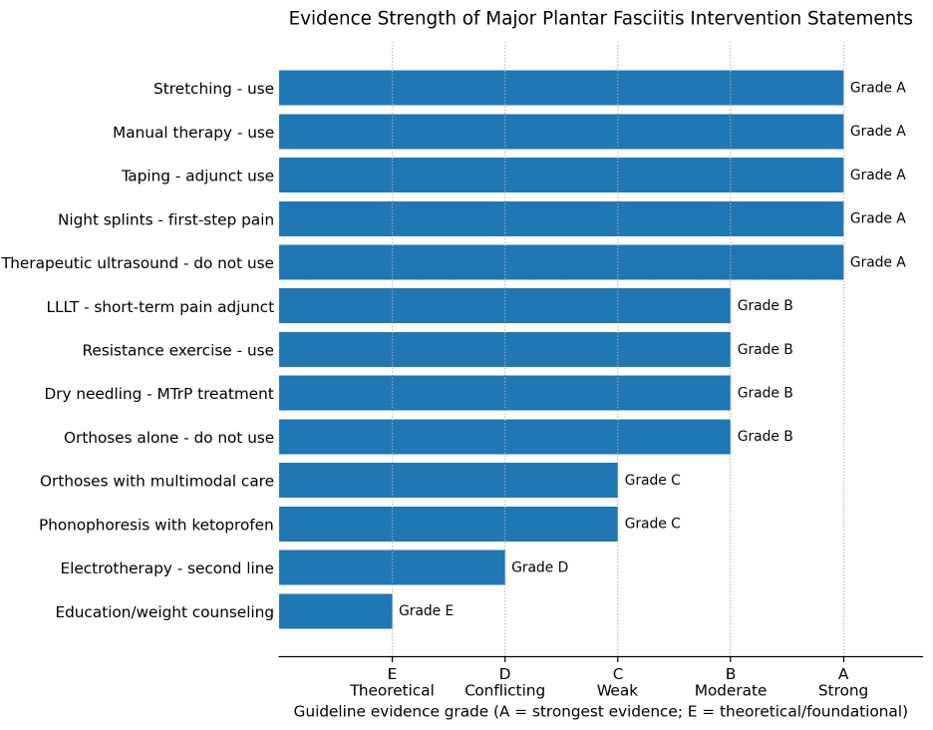
Figure 2. Clinical pathway synthesis derived from the guideline. The figure condenses the article’s decision-making sequence into screening/classification, differential diagnosis, baseline measurement, intervention selection, and reassessment.

Practical Clinical Takeaways
| Clinical Area |
Main Recommendation |
Grade |
Practical Use |
| Diagnosis and screening |
Use clinical pattern recognition: plantar medial heel pain, first-step symptoms, palpation pain at the proximal plantar fascia, positive windlass test, and negative tarsal tunnel testing. |
B |
Rule out mimics when symptoms are atypical or not improving. |
| Core treatments |
Use plantar fascia/gastrocnemius-soleus stretching, manual therapy, taping, and targeted night splints. |
A |
Make these the backbone of conservative care. |
| Orthoses |
Do not use orthoses alone for short-term pain; use prefabricated or custom orthoses only with other treatments. |
B/C |
Most useful as an adjunct when foot posture or taping response supports use. |
| Exercise and loading |
Prescribe resistance training for the foot and ankle musculature. |
B |
Builds local load tolerance and supports long-term self-management. |
| Dry needling |
Use for myofascial trigger points in the gastrocnemius, soleus, and plantar foot muscles. |
B |
Adjunct for pain and disability when clinically indicated. |
| Physical agents |
Avoid ultrasound; LLLT may reduce short-term pain; electrotherapy is second line. |
A/B/D |
Avoid passive modality dominance. |
Figure 3. Selected intervention-strategy excerpt from the article’s decision tree (page CPG25). The original guideline states that reproduction and distribution are permitted for educational purposes.
Reference
- Koc TA Jr, Bise CG, Neville C, Carreira D, Martin RL, McDonough CM. Heel pain – plantar fasciitis: revision 2023. J Orthop Sports Phys Ther. 2023;53(12):CPG1-CPG39. doi:10.2519/jospt.2023.0303
Page 1 of 4812345...102030...»Last »